Revising draft documents in Microsoft Word—especially after a substantive review by the-freelance-editor—can seem daunting, especially at first glance! With stricken text, redlined and highlighted suggestions, queries and notes in the margin to explain and guide changes, your “hilited” (to signify the text is highlighted with suggested changes) file can appear particularly so; the “acpted” (with those changes accepted, to ease readability, but notations remaining in the margin) file is only minimally better. However, if you take the suggestions one by one, any real challenges will be overcome much more easily. We trust the rewards will help you along, too.
A reminder of what you get
As noted on our “samples of work” web page, substantive reviews created by the-freelance-editor consist of these primary parts:
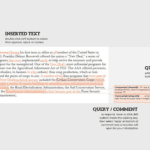
- in the running text, we place redlined changes (including stricken text and new text; note that, besides grammatical corrections, these changes are never mandated but are suggested changes or merely indications that some of the wording might not be saying quite what you intended it to say in the best way possible);
- in the comments sidebar, we place queries, additional notes, possible options for rewording or rephrasing, and ideas for improving organization, logic, and intended meaning—as well as compliments and praise!
In most cases, you will receive this information in two different electronic files. One file will use Microsoft Word’s Track Changes tool to show all suggested deletions, possible replacement text, and thoughts for other “improvements” (this file uses your original file title along with a version number and the abbreviation hilited, for example originalFileName-ver1,hilited). The other file will have nearly all of those options approved (this file uses your original file title along with a version number and the abbreviation acpted, for example originalFileName-ver1,acpted); it looks cleaner and is less overwhelming but does not always convey all the information shared in the hilited file. Both files include an identical series of queries and notes in the comments sidebar.
You will need to decide which file to work with, but I’ve found that most clients end up preferring the hilited file—though it does take some getting used to. This file allows authors to see exact errors alongside suggested changes as distinguished against their original (or previous) version.
Revising a draft document in MS Word: Preparing the app
Before you start revising a document for the first time, you should make the tools you’ll need in Word readily available to you. While each version and installation can be a little different—I’ve never found consistency to be a Microsoft asset—some general assistance follows (you may also find this image helpful):
- Open a new, blank document in your application of Word.
- At the very top of your screen, you should see a “quick access toolbar”—out of the box, this toolbar generally includes a save icon, arrows for undo and redo, maybe a printer icon, and a small down-pointing arrow: click on the arrow and slide your mouse down to More Commands on the drop-down menu to add more quick-access shortcuts.
- In the dialog box that opens, move to the right-hand boxed column and use the drop-down menu in the Choose commands from box to select All Commands; at the same time, make sure the other drop-down menu, in the Customize Quick Access Toolbar is set to For all documents (it should already be selected, but make sure it is). In that boxed column, you should see all of the icons from your current Quick Access Toolbar.
- In the box under All Commands scroll until you locate Accept This Change and click on it with your mouse; select “Add” from the middle column, and the new command should appear in the lineup of your Quick Access Toolbar. Continue scrolling and do the same for Reject Change.
- Note: As you scroll, you’ll see other choices for both “accept…” and “reject…”; feel free to experiment with the others if you wish, but I find their actions do too much at once or otherwise confuse what we’re trying to do. Still, you may find a variation you like better.
- When you’re finished adding to your menu, select OK at the bottom of the large dialog box.
- You should now see the new icons in your personal Quick Access Toolbar. Close the new document.
You can also find these commands in the Review tab, but having them available any time you want them at the top of your screen will make your revising job easier in the long run.
Now, you can open the document you’re ready to work with.
Revising a draft document in MS Word: Doing it!
Step 1 in your revision should be to rename the file so that you can save your updated document. My suggestion for renaming is to keep your original file name and replace my attached identifier, similar to this: instead of originalFileName-ver1,hilited rename your new file originalFileName-ver2. If you want to keep a variety of files with different revisions, you can use the names originalFileName-ver2a, originalFileName-ver2b, or even originalFileName-ver2b1. When you are ready, just send me the file you wish to move forward with. (In case you’re interested in looking ahead, the next review file you get from the-freelance-editor will be named originalFileName-ver2b1,hilited—or whatever your current version number was—to reflect the progress in your project.)
Next, let’s start working through your document.
Redlined “highlighted” text
The term redlining dates to the early days of correcting handwritten or typed text, times when a red pencil (later, a red pen) was used to mark up pages. While I did start my career with a designated red pen, nearly all revisions are now done on computer screens and any color can be used to highlight changes. Regardless, the term has carried forward.
When you receive a reviewed document from the-freelance-editor, you will likely notice redlined changes right off the bat. Remember that these changes are not mandatory but are intended to mark specific points where your document may need some attention. If you agree with my suggested change, simply highlight the relevant text with your cursor, move your mouse to your Quick Access Toolbar, and select the checkmark icon to Accept This Change. If you disagree with a suggested change or want to make your own revision, highlight the relevant text with your cursor, move to your Quick Access Toolbar, and select the X icon to Reject Change. If you are using the Track Changes feature of Word yourself, any revisions you make will show up as a redlined change in a color different from any other user.
Continue working through your document, accepting and rejecting or revising as you wish. When rejecting a change, be sure to consider how to best get your point across to your readers—it is seldom your best option to revert the text back to its original without any sort of revision.
Comments boxes
Queries about meaning, intention, and word choice, as well as explanations about errors and reasons for suggestions, along with compliments and thoughts about options all appear as comments in boxed bubbles located in the right margin of many, if not most, reviewed pages you get back from the-freelance-editor. As you work through these boxes, you’ll have two ways of treating them.
- If the information in a box is merely informational, you can delete it when you’re ready by right-clicking inside the comment box and choosing to delete it. (You may also delete the box by right-clicking in the running text highlighted by that box’s shadow.)
- If the text in a box asks a question or if you want to respond to my text for any reason, hover over the comment box or click inside it; doing so will reveal two new options at the bottom of that box: Reply or Resolve. In general, please do not use the resolve option (do so, however, for your own use if you want to mark a box that you’ve considered but want to react to later; then, delete it when you’re done). If you wish to respond to my text, either to explain something or to answer a question, just click on Reply and write your text in the new, connected box that appears.
To create a comment box of your own, venture to the Review tab of your document and select New Comment; an empty box will appear in the margin, with your cursor already located inside it. If you wish to associate a box with specific text, highlight the text before selecting New Comment. Note that you can also delete comment boxes from the menu of this tab.
Comment boxes sometimes compress on themselves so that more boxes can appear on a page. When this happens, the-freelance-editor will insert random page breaks so that you can fully read the complete comments of a box without having to click inside it. When used, I will insert an explanation as part of the break.
Revising a draft document in MS Word: That’s all!
With a bit of practice, you’ll easily master this “system” of revising a draft document in Microsoft Word, and you’ll be able to return your second version of text so that we can move along with the process of finishing your project—ensuring that its text (1) says what you want to say to the audience you want to reach and (2) allows your readers to concentrate on your message, not your mistakes.
Of course, if you have further questions, do not hesitate to contact us. We are always here for our clients—existing and prospective. Best wishes,
Stephen, the-freelance-editor,
where we work with our clients to help them say
what they want to say to the audience they want to reach.
Contact us, even when you just think you might be needing us!
And, please like or share this post or leave a comment—
on any of our growing social media outlets.
the-freelance-editor.com has many specialty divisions that include fact-checking and
ghostwriting—whatever it takes to help you craft your words into a valuable message.
originally posted February 28, 2022;
no text revisions to date
image information: Both images consist of screenshots with Microsoft Word menus and an open document, manipulated in Canva by the-freelance-editor.


